
Ever since I got Ender 3 v2 (review), I wanted to upgrade a couple of things. As Creality’s firmware doesn’t cover every hardware upgrade that comes to my mind, I have to resort to compiling Marlin firmware myself. Don’t be put off, behind the complex programming lingo, lays a fairly straight forward list of values to change to tailor Marlin firmware to your needs. If you follow this guide, it’s unlikely you screw anything up. Let’s build Marlin 2.0 for Ender3 v2 to enable various upgrades.
Current Ender3 v2 upgrades

My list of upgrades isn’t massive just yet, but I upgrade my machine as I go. So far I have added the following modules to my Ender 3 v2:
- BL Touch to ease levelling (guide)
- Filament Runout sensor from spare Z-stop (guide)
- All-metal hotend from BigTreeTech (guide)
- Touch LCD display (coming up)
- One Octopi, 8 printers (coming up)
- PrintStick – Portable notification made from M5Stick Plus C (coming up)
The upgrade list may change in the future, so this article will remain separate from the project articles above, so it is always up to date and relevant. If you own an Ender 3 v2, chances are that the upgrades you will opt-out for will be the same.
Each upgrade has a dedicated article, that explains everything you need to do to complete the upgrade yourself.
Prerequisites
I would strongly recommend to use Visual Studio Code and PlatformIO to configure Marlin 2.0 for Ender3 v2 and build your firmware. It takes only a couple of moments to set up, and you will be ready to compile (build your own) firmware.
Visual Studio Code

During the installation, use the option to add the VSC as Path in Windows, this will make certain things easier for you moving forward. Once installed, the left side will have an extension option. Select PlatformIO and C/C++. You should be able to see the “ant” head from PlatformIO.
Marlin 2.0

Download .zip files from GitHub for Marlin 2.0 and Configurations. Extract both zip files to separate folders. If you know how to build your firmware, don’t copy the files over just yet. First go to VSC, open PlatformIO and the folder containing Marlin 2.0.
Open subfolders until you see platformio.ini file. This is your root folder. Locate the build option at the bottom of the VSC (checkmark at the bottom of the file) and try to compile the default firmware. If you succeed, you are good to go, otherwise here are some things to try:
Building Marlin 2.0 firmware for Ender 3 v2 from source
While the guide is specifically catered for Ender 3 v2, you could apply other configurations and consult the changes made in this article to what you are trying to achieve. It could help you understand the process and build the firmware for other printers. If you have an Ender 3 v2 machine, you will find it easier.
Before you change anything, you will need to check the revision of your motherboard. Pop the cover open and check what’s printed on the board. At the time of the writing, Ender 3 v2 comes with two board revisions: 4.2.2 and 4.2.7.
Setting up the build environment
PlatformIO needs to know what microcontroller is at the heart of your board. This information is stored in the platformio.ini file and you have to type in the model of the processor used for your board. In both cases (4.2.2 and 4.2.7) it’s the same:
[platformio]
src_dir      = Marlin
boards_dir   = buildroot/share/PlatformIO/boards
default_envs = STM32F103RET6_creality
include_dir  = Marlin
Save the file. PlatformIO will prep the build environment for you. For the most part, all you have to do is to modify the 2 files responsible for configuring your printer parameters. These will differ based on the installed upgrades and preferences.
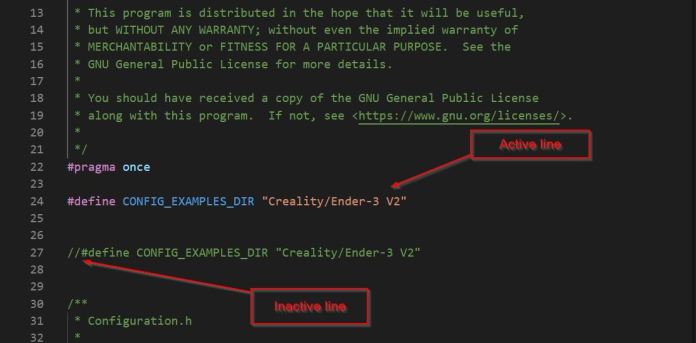
The easiest way to find the line responsible for the parameter is by searching for it using Crtl+F. The modification will require you to change the values, disabling lines using comment annotation “//” or enabling settings by uncommenting the lines.
I will split this part per upgrade so you know which settings are important to your use case.
Configuration files
Marlin GitHub comes with configuration files for each printer. Both Ender 3 and Ender 3v2 are supported so if you are not making any special changes, you can simply grab the files from the correct directory and replace files in Marlin2.0/Marlin folder.
LCD screen
Configuration folder for Ender 3 v2 will also include screen-specific files. You may need to flash the screen separately to update the display firmware. The procedure is very simple. Drag the DWIN_SET folder onto an SDCard and put the card into the reader hidden behind the screen (you need to open the back cover). Then power up your printer and wait until the screen turns orange. Turn off the printer again, remove the card and you are all set.
Motherboard
These files will change a number of settings to set up your Ender 3 v2 with Marlin 2.0. It’s not all just drag and drop as your first changes will depend on the motherboard revision. Go to #define MOTHERBOARD section and use:
- for 4.2.2 boards :
BOARD_CREALITY_V4 - for 4.2.7 boards :
BOARD_CREALITY_V427
Here is the list of changes for the Ender 3 v2 vs default configuration file.
Changes to Configuration.h
Changes to Configuration_adv.h
I listed these changes for reference, if you replace default files with configured files, most of the changes would be done for you already. Please note that this guide is done according to Marlin 2.0.7.2 and with time some of the parameters can get outdated.
Adding BL TOUCH

If you have a BL Touch, you can enable it in Marlin firmware as well. Changes will strictly depend on the type of the sensor and how you want to use it. I have this BL Touch sensor added to my Ender 3 v2 (guide), and I will share with you my configuration.
There are a couple of things you should consider. Check the sensor revision (mine is v3.1) as different revisions support different voltages. If you have other than BL Touch sensor, Marlin software provides you with alternative definitions that could meet your needs.
Depending on how your sensor is connected, you may need to define it differently in the configuration.
- sensors with 3pin + 2 pin cable use:
#define Z_MIN_PROBE_USES_Z_MIN_ENDSTOP_PIN - sensors with 5pin cable use
#define USE_PROBE_FOR_Z_HOMING


Adding Filament Runout Sensor

After upgrading Ender 3 v2 with BL Touch I ended up with an unused Z-stop. I quickly found a way to repurpose it into a filament runout sensor. You can read it all about it here. If you already have a sensor in mind, you can simply enable it by modifying config files.
Pay extra attention to filament runout state as this will determine if you should set it to LOW or HIGH. Use M119 console command to get the current state of the sensor. If the filament is inside the sensor using M119 should show:
Triggered– the settings should be set toHIGHOpen– the setting should be set toLOW
All Metal Hotend with higher temperatures
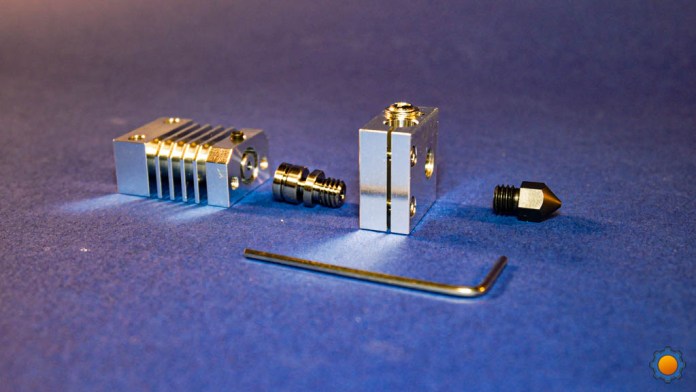
I got a BigTreeTech all-metal-hotend recently, as I want to try very expensive Onyx nylon I pinched for testing from work. Unfortunately, the stock nozzle and firmware is capped at 260℃ and I need 280℃ to get this stuff running. I have a separate guide (pending) that shows you changes I had to make to my Ender 3 v2 to add the new hotend.
Increasing the temperature comes with problems. It’s not as simple as changing the values in settings. You have to consider other factors. Depending on the final temperature and duration of use, you may also get a better heating element and more resistant to temperature thermistors.
Whatever your hardware choice is, to increase the temperature in the menu, you have to raise the maximum temp in the configuration file by 15℃ more than the desired value. Marlin 2.0 will shut off power to the heating element if the temperature reaches the max value and the printer will let you set the max temperature which is 15℃ lower than specified in the file.
With new hardware come new… parameters. If you notice oscillation of the temperature, you have to tune in your PID controller. Before you dive into the rabbit hole, if the autotune doesn’t work well for you, consider testing other thermistor values.
To tune it, open the printer’s terminal (via Octoprint or your fav software) and run the tuning process: M303 E0 S275 C15 (Tuning, Extruder number, Temperature, Iterations). The process will measure deviation and try to retune the printer by giving you new values to enter by displaying:
#define DEFAULT_Kp 15
#define DEFAULT_Ki 1
#define DEFAULT_Kd 44
You can quickly test the new values without building the new firmware. To do so, use the M303 command with PID params: M304 P15 I1 D44. This will set new PID values for your hotend. Test the temperature again and adjust if necessary.
Additional modifications can be done manually. To understand how PID values control the heat curve, take a closer look at this GIF. It shows you relations between all parameters. I found the automatic PID to be a great starting point.

Final thoughts
Whatever upgrade my Ender 3 v2 will get next, I will update this post to keep it relevant. It should serve me as a reminder of how to recompile firmware for specific printers and speed up the build process. If you also take advantage of this guide, that’s even better. If you have cool upgrades for your printer, let me know in this Reddit thread. Who knows, I may end up adding it to my 3D printer.


")


