I praised the hardware of reMarkable2 in my review. Since then, the device has received a couple of updates including screencasting, Google Drive and Dropbox support. None of the updates was bringing custom templates to the table. Something I really needed for my workflow. The option to add reMarkable2 custom templates was there, but it was hacky, required SSH access and knowledge of Linux. Not any more!
How to make reMarkable2 custom templates and boot screens
Searching for completely something else, I came across a superb tool to customise your reMarkable device – freeremarkabletools.com. Unlike some of the SSH tools, this reMarkable helper is free and easy to use. Tinkering with root access isn’t something I was comfortable doing at first (especially that I paid for the device out of my own pocket), but the software looks well developed. Besides, if I’m not going to risk it for all reMarkable owners, who will?
Adding custom boot screens wasn’t important to me, but the ability to reMarkable2 custom templates was a lifesaver! Anyone using reMarkable2 should seriously consider giving it a go. The process of customising your device is quick. Apart from community templates, you will be able to make your own templates, splash screens and back up your settings.
I’m several reMarkable2 custom templates in, uploaded some extra splash screens too and I’m pleased to report that everything is working fine on the latest beta 2.10.0.295 of the software. Of course, your experience may vary especially if you are running a different version.
Getting started

Download the rM2 Tool and install it on the platform of your choice. It’s recommended to use the USB cable to connect to your tablet. You will need your root credentials which you can find in the Menu>Settings>Help>Copyrights and licenses. Look at the paragraph “GPLv3 Compliance” to get the password.
Now that you are connected, you can do all sorts of tricks. Start with downloading the templates you have on your device. Make a backup while you are at it (it’s better to be safe than sorry!). All files will be stored in the installation directory. You can browse these there.
Importing templates

You can import new templates to your reMarkable2 device. There are small limitations. You can add new templates to the template portfolio, however, the template’s thumbnail can be only associated with existing layouts. Don’t worry, this only affects the template list. Your notebook will create an appropriate thumbnail for your actual notebook. Thankfully, each template can be named, so they won’t be hard to find.
The software has a small collection of templates stored on the server, to try it out, you don’t have to make your own, you can simply download the list from the server and see if there is anything you like.
Make your own templates

I’m pretty sure, you will follow my steps and make the templates that cater to your needs. After all, this is the best advantage of reMarkable2 custom templates. The easiest way to make your own templates is to use Photoshop, GIMP or similar software that has support for layers.
Create a new canvas that has a resolution of 1404×1872 (vertical) or 1872×1404 (horizontal) and set your background to white. On this base layer, you can start adding text and graphical features. It’s a good idea to offset your template to the right to accommodate for the reMarkable toolbar. Personally, I hate when the toolbar gets in the way of the template. Offset it by 115px and you should be ok.
In my experiments, I noticed that 50% opacity works well for guidelines and checkboxes, but your preference may vary. Save the created image preferably as PNG, use the New Template option to create an empty template and drag and drop your file. Don’t forget to name the template and select the thumbnail for it.
Importing splash screens

Option Customizing will take you to the menu that lets you easily swap images for boot, sleep, reboot and so on. Have the image ready (the same resolution as templates) and drop it onto corresponding sections. The software will copy the file to a local folder and keep the history of recent changes in case you want to change back.
Other Functions
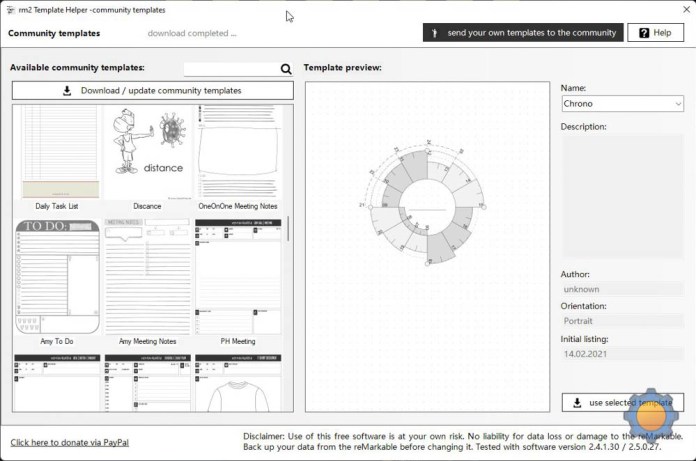
rm2 tool – community templates 
Default templates
That’s not all, the software comes with even more features to try. From editing email address lists to printing directly from the reMarkable tablet. I’m less interested in these, but if you want to learn more, download the software and start playing!
Final thoughts
It goes without saying that Roland’s software brings new life to my device. Thanks to reMarkable2 custom templates, the notebook feels personal and suited for my use. The recent Google Drive integration allows me to access the files quicker and share them without having extra apps installed on my computer. It looks like that the investment in reMarkable2 was a good one. It truly replaces notepads I carried with me and I love it. If you appreciate the rM2 tool, feel free to donate to Ronald software! Definitely worth doing! If you have any comments or questions, let me know in this Reddit thread.


