My last post was about the Creality LD-002H printer (review). While I focused on the printer itself and the associated challenges of the SLA technology, I feel like sharing my experience and the obstacles I had to overcome to make my fake “Mars landing of Perseverance” video. Despite worries and frustrations, I had a great time trying things out and learning new things.
Initially, I got my hands on a “print-ready” model of Perseverance rover designed to be printed on FDM printers. I already have Ender 3 v2 (review) and the original Ender 3 (review), but upon closer investigation of the STL, I found the model to be too simplistic. A lot of details were omitted to make the model printable.
Knowing that I need a key model piece to complete the review of the Creality LD-002H resin printer, I decided to look for more detailed models. This is where I stumbled across this lovely page. It has a plethora of NASA spaceships to browse. There is one problem though. Not all of them were made with printing in mind.
From 3D rocks to Mars
I knew from the beginning, that I will take my model to Mars, just like I’d done with the SKY robot. I needed a detailed model, and the .blend file was just what I was looking for. I dabbled in Blender about 10 years ago, but my experimentations never went past renders of rocks. The model is detailed enough for the purpose, except some parts are completely not printable (wheels) and the 3D file isn’t divided into printable chunks.
I decided to go all-in and used the biggest part of the rover to size the print. I knew I would be printing in chunks so it made sense to start with the biggest part, try to fit it on the print bed and then size everything else accordingly. According to Chitubox, that’s 4950% of the import file.


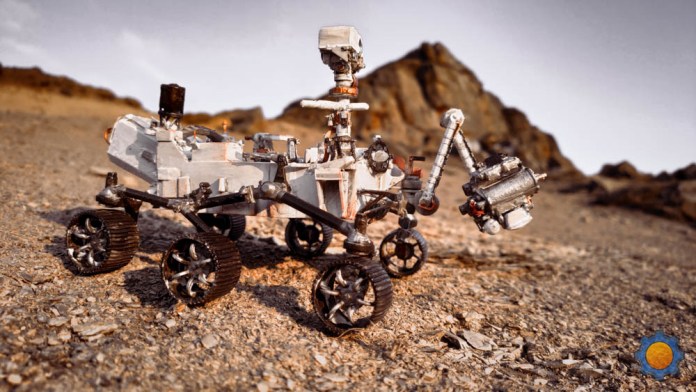
I spliced the model into logical chunks and started my prints. I needed to modify wheels as with the number of ribs on each wheel, and thin spokes the wheels were impossible to print. My final prints were flawed but salvageable. Even though print collapsed here and there, not perfectly round wheels would give an impression of weight. Unplanned feature of the model, but at this point, I knew the wheels wouldn’t spin. In fact, none of the parts would move at all.
I had 2 failed overnight prints which set the project back a week. This was a major blow as I wanted the project to be more relevant. The biggest mistake I made was not realising I could do something like this until I watched the actual stream of the landing. Discouraged by the delay and failed prints, I had to examine what caused the failure.

Managing supports when slicing prints for resin printing is vital. Too many supports and you will have a hard time separating the print from supports and damage it in the process. Not enough of them and unsupported islands will mess up an entire vat of queued parts.

A carefully moderated thin supports were the answer to my problems. I could use plenty of them without worrying too much about damaging the print. The disadvantage of this is 1-2h needed to separate the parts from supports, then extra time to clean the spikes. It’s time-consuming.
On top of that, I was already sick of cleaning my sink, as the resin sticks to it and it’s notoriously hard to remove. To speed up the process I bought Creality UW-01 (review) curing and washing station which removed a lot of frustrations and left me with disco images of spinning rover parts.
- Creality UW-01 on Creality Store
- Creality UW-01 on AmazonUK, AmazonUS
- Creality UW-01 on Banggood (split into 3 payments with Klarna)

Dremel was extremely useful at removing print scars leaving clean surfaces ready to be primed for painting. At this point, I gave up on fine painting every detail of the rover as time started to be a serious consideration. I’m actually still debating getting an airbrush, but decent stuff is pricy. It’s not the stellar paint job I wanted but it’s good enough for a photoshoot!
Faking the landing
Somewhere between week one and week two of the project, my Fimi x8 SE Drone (review) arrived from RMA. I will tell this story another time (in my upcoming review), but I came up with an idea to mock up the landing as well. After all the drone is equipped with a gimbaled camera that can point downwards. If only the drone could lift the rover up.

The model of Perseverance weighs about 300g. It was actually heavier than that, but I drilled holes in the main body to mount the suspension and found out about the trapped, liquid resin inside (I guess I know what I run out of resin so quickly!). It was a risky move to try it out, as I only just put the rover together and didn’t have any decent pictures, but I’ve taken the drone to the backyard to see if I can lift it with a drone.
It’s not a secret that the lift was successful. I was actually quite impressed by how much weight the drone can carry. The Perseverance rover is not its limit. There was another problem. The automatic take-off I used up until now, raises the drone about a meter above the surface. That’s too far. The rover would be very small on the video, so I needed to cut the ropes short and take off manually. I also used a rubber band to dampen the forces caused by the sudden movements.

Failure
I climbed the Roseberry Topping too late. It was already past sunset and by the time I got the drone out, it was too dark to film anything. I gave it a go just to see if I can use LED panels to provide enough light to get this filmed.
Unfortunately, it was too dark and my failed attempt in lifting the drone caused minor damage to the print. I decided to stay another hour to take some pictures using artificial lights. It was a great idea, as it gave me the motivation to make the trip again the day after. It might be hard to tell, but you can see the arm is missing a piece of its equipment in the pictures below.

2nd try a charm
This time I set of earlier and I left myself plenty of flying time and natural sunset light to take the pictures. Being able to see everything allowed me to film several landing manoeuvres and the biggest challenge was to counter the rover sway.
As it was really nice and warm outside, I wasn’t the only one on the mountain. I can only imagine what others were thinking.


Epilog
Perseverance is a static model. It doesn’t have moving parts or lights and I will find it a nice resting place on my shelf. At some point, I would like to print a bigger version of it with moving parts. I will probably practice SLA printing a little bit more before this happens. That page has enough models to keep me entertained for years to come and I already have a Voyager satellite waiting to be painted. I guess it’s time to invest in an airbrush and refresh the collection of paints as I used 4 colours only to paint the rover. If you have any comments or questions feel free to leave them in this Reddit Thread.


")


