After a couple of resin prints made thanks to my Creality LD-002H (review) resin printer, I quickly realised how messy and time-consuming the process is. I have access to the curing station at work which I can use at will, but driving 10 min to stare at your print spinning on a UV plate for a further 30-40 min is not how I like to spend my time. I had 2 options – continue using the sink and get a cheap UV lamp, or spend money on a 2in1 wash and cure station from Creality UW-01. I think you know which option I went with!
Creality UW-01 2in1 washing and curing station

My commitment to using the sink stopped when I had 4 build plates of parts to print, wash, and cure for my Perseverance rover model. After receiving several reminders about hard to remove resin stains in the sink, I decided not to tempt the faith and solve the problem in the fastest possible way: throw the money at it.
Instead of shopping around for the best possible price and 2-week delivery, I picked AmazonUK and Prime next day delivery, so I could finish my resin model in time for the Mars landing. 24h later the Creality UW-01 was with me, required minimal assembly or instructions. That, and 5L of 99% alcohol. You know that you are old when you buy that much alcohol and none of it is for drinking!
- Creality UW-01 on Creality Store
- Creality UW-01 on AmazonUK, AmazonUS
- Creality UW-01 on Banggood (split into 3 payments with Klarna)
Creality UW-01 addresses 2 problems. It washes resin prints in the alcohol jacuzzi and hardens it by shooting UV lights. Not at the same time, mind you but in a quick succession which greatly reduces the time needed to go from the sticky and sloppy print attached to the build plate, to cured, hardened print ready to use.

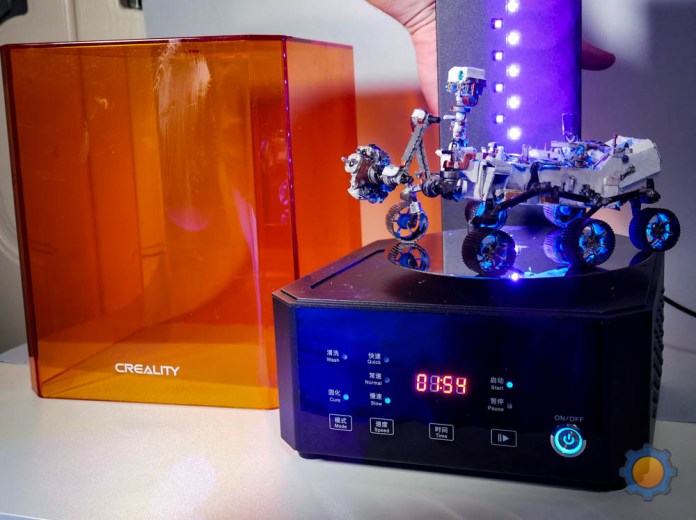
Creality UW-01 shares the same footprint as the LD-002H resin printer. It’s slightly shorter, but you can swap covers if you want to. In front, you will find a big glowing timer, buttons to control the wash and cure processes. It comes with everything you need (except alcohol) to start processing your prints.
The panel has 4 function buttons which are a little bit mushy and a satisfying metal power on/off button. The 8 segment display shows time and associated LEDs inform you about the currently selected options. You can use speed and time buttons during the process to change the speed or add more time to the selected process. Creality UW-01 has sensors to detect the UV shield and won’t start curing and washing cycles without it.
Creality UW-01 as a washing station

You will need a total of 4.5L of alcohol to fill up the tank. You will also need this much to dunk your prints properly. Don’t worry, the container comes with an airtight lid, which transforms it into a storage container. Although not tested, when properly locked, it should keep the alcohol inside even if you accidentally knock it on its side.
The Wash process will engage the magnetic turbine inside the alcohol tank. The spinning blade will swirl the alcohol aiding the wash cycle. To make the job easier, Creality UW-01 comes with 2 build plate holders and a basket. Attachments are great for holding the build plate inside the tank, while the wire basket can deal with bigger parts.
Alternatively, use it not and repurpose it for frying your own chips. Annoyingly, the build plate brackets come with a single knob, so you have to borrow one from the printer to keep the plate in place. Do yourself a favour and get a spare one like this (M6 x 10mm). Swapping these back and forth is annoying and I already dropped mine into the vat on several occasions.


Select washing option, speed of the turbine and time and the Creality UW-01 will whirl the turbine in both directions at 1 min intervals. You will hear a beep when the process is done. I suggest 5 min wash unless you have a reason to believe your print needs a longer relaxing, alcohol-infused soak.
My second and very important piece of advice is to buy a sieve. The dissolved resin creates a sludge inside the tank which builds up with time creating a residue on the turbine and the model itself. It’s messy, annoying to remove so sieve the alcohol suspension from time to time to remove the resin leftovers. Line the sieve with a cotton cloth for finer filtering and the IPA will last you much longer.
Creality UW-01 as a curing station
Before you cure your print, remove the supports. Uncured resin is less brittle, making supports easier to snap off without damaging your print. Put the washed print onto a polished spinning plate (preferably before you make it spin). The spinning plate is a bit of a pain to put onto the rod, as there no markings aligning the plate with the rod.
The plate rotates in 3 different speed settings:
- slow
- medium
- I will knock things out of the plate using centrifugal forces
An increase in the rotation has no bearing on curing times, so you can skip the DJ settings and stick to the slowest option. It takes about 15-20 min of curing time to process the Perseverance model. You could cut it short for smaller parts. The maximum timer available is 90 min. The enclosure could use internal mirrors to bounce the light around and increase the temperature inside the chamber – something I will think of adding myself.
Other things worth mentioning
Creality UW-01 makes a bit of noise. It’s not loud, but on par with the average 3D printer. If you are used to that noise, you won’t mind the station at all. Especially, that you will be done in about 20-50 min.
The 12V power supply has a fairly long cord which is convenient and Creality UW-01 comes with 2 different grips to hold the build plate – one shallow which is probably less useful, and one that you can lower down significantly into the tank. Just make sure the spinning blade won’t hit the print, as sticking out parts can get through the protective cage.
There is a spare bearing for the spinner included. I guess over time the IPA can penetrate into the spinner’s bearing and may need replacement or service. I kept my tank filled with IPA for months now and the bearing looks fine.
Final thoughts
I still have to clean the vat myself, but I can do so while the print is being washed and cured. Creality UW-01 saves time and hassle. If you are serious about resin printing, it’s a much better investment than a DIY lamp and half baked washing solution. Despite having free access to one 5 days out of 7 and spending my own money instead of trying to get Banggood to ship one for the review, I consider this a very good investment, it’s not perfect but comes close enough. How do you process your resin prints? Let me know in this Reddit thread.
💳📈 – See the transparency note for details.


")


