
This guide to diodes for beginners aims to give you all the knowledge you need for Raspberry Pi and Arduino projects.
Diodes are simple electronic components that can visually resemble resistors. The main function of it is to direct the current flow one way, preventing it from returning. The use in electronic circuits could involve protecting other elements, assuring the one-way flow of the electrons and regulating your voltage. Because of this function diodes have to be oriented correctly, otherwise, it will stop the current from flowing. It is worth mentioning that LED lights are also classed as diodes, because of their qualities and structure.
Schematics
Diodes are marked on the schematics like this and the triangle indicates the direction of the current (note that electron flow is opposite).

Bands and forward voltage & PIV
The direction of the flow is indicated on a diode with a band. The band is placed next to the cathode (-) pin, which means voltage (+) should be applied on the opposite end.

When selecting a diode, one of the most important value is Peak Inverse Voltage. This tells us max V that can be applied to the diode mounted in reverse (stopping the current) before diode will receive damage and allow that current to travel through. This information is provided on data sheets from manufacturers.
We know now, how not to blow anything up, there is another thing you need to remember. Use of diodes will cost you Voltage. You should expect losses about 0.3V for germanium diodes and 0.7V for silicon ones. This is also an estimated value and remains mostly true for loads up to 40% of the diode specification. Losses in Voltage can be greater if a bigger current is applied. Fear not, the changes aren’t big, and for the most part can be ignored, as long as you remember that some you will lose some of the Volts in the process. You can also take advantage of this fact and use diodes as gates, remember no voltage will be present if the supply voltage is lower than 0.7V (for a silicon diode).
Zener and LED
There are another 2 types of diodes I’d like to talk about. Light Emitting Diode, you probably know well. But before we jump to it, let’s talk about zener diode.
Zener diode

These work in a slightly opposite manner to a normal diode, connected the same way as a regular diode, it drops the voltage as expected 0.7V (for a silicone one), however, connected in a reversed manner, it will stop the current until the Voltage reaches the Zener Voltage. At this point, no matter how much current (I) you will run through this (until limit), it will limit the same amount of Voltage. Ie: diode with 6V Zener Voltage attached to a 12V (through a resistor) would lower your voltage to 6V and keep it there regardless of the current supplied (up to the diode max current limit). In the same situation should voltage drop below 6V, the diode will stop conducting electricity, as the diode with 6V Zener Voltage needs 6V+ to be conductive.
LED

Apart from the obvious light emission, LED also act as diodes, and if the voltage is low (up to 5V) we can see the zener diode qualities. Bear in mind that operating current of the LED is very low, and the ‘zener’ voltage of the LED varies per colour (this also influences the forwarding Voltage of the LED, as it is different for each colour).
LEDs are a very effective source of light, require low voltage (3-12V range) and usually current under 20mA. To as other diodes – to make LED shine, the forward current value must be met.
Usage

Diodes can be used to regulate the circuit, with LEDs emitting light, to indicate the current flow and provide us with… light! In most cases, you will be using LED for the light properties, but understanding the diodes, will allow you to solve your ‘LED isn’t working’ problems. This guide on diodes for beginners should get you started with the topic.
LEDs are one of the more forgiving components in terms of voltage, given correctly added resistor, you would be able to connect up to 12V to a single LED. It is the current that matters. Before we get to that – let’s talk about voltage.
Forward voltage is a value in Volts required to pass through the LED – remember the LED is still a diode, and as one has diode’s characteristic.
Voltage drop is a value in Volts that represent the loss of potential, in optimal conditions, using the correct resistor.
These values vary per LED type, the semiconductor used, LED size and colour. Forward Voltage can range between 1.7V to over 4V, and the Voltage drop can range from 1.6V to over 4V as well. These values are provided in datasheets and are taken under correct conditions and with the correct current being used.
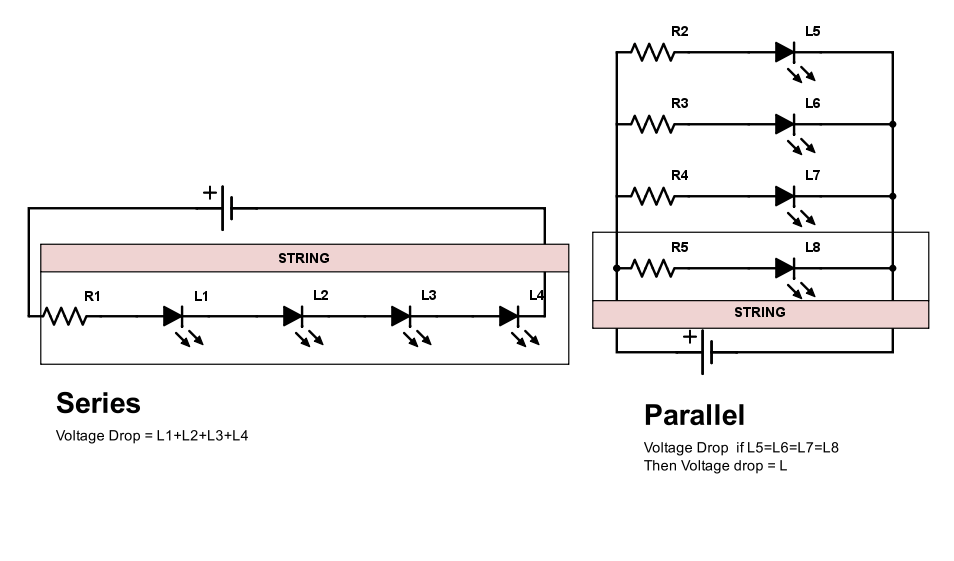
This matters greatly once you start to connect multiple LEDs together: A quick note here, don’t try to connect LEDs directly in a parallel circuit. It is unlikely that any given LEDs even from the same batch have the same Voltage dropping value, leading to the uneven current split. While you may get away with splitting 20mA across 2 LEDs without causing any damage, the situation where the current needed is bigger can cause one side of the circuit to be overloaded. Use a resistor for each string in a parallel configuration.
Current – know your enemy!
LEDs are very sensitive to current. Although higher than suggested current won’t kill a LED instantly, it will cripple its lifespan. Ideally, you should aim for 10-20mA of current per LED. This leads us to a very important element in the LED circuit – resistor.
The resistor can be placed before or after the LED, and it will be still in line with Kirchhoff Law. Adding a resistor to the circuit is crucial to reduce the current hitting the LED, which can cause LED overheating and damage. To calculate the correct resistance we follow the equation:
R = (Vs -Vled)/Iled
Calculating current for simple LED is straightforward, if you are planning on daisy chain LED, and link them in parallel strings you may want to refer to more sophisticated calculators. Take the results and diagrams with a grain of salt, as not all wizard-made solutions will be 100% correct, especially when you are using battery as a source power, or dozens of LEDs. Value of resistance should be rounded up to the nearest resistor available, so for 190 Ohms, the closest available is 220 Ohms.
Power dissipation
The last thing to remember, when working with LEDs and resistors, is the ability to dissipate the heat. Good old Ohm comes to the rescue again.
Knowing the LED voltage drop, we know the total Voltage drop of the load: if you are using 6V supply and your LED needs 2V, your total V = 4V. We also know the current of the LED needed: let’s say it is 0.5mA. Using these values with the equation from above will give us 8 Ohms. What rating of the resistor should be applied?
P=V×I
Our example gives us P= 4V* 0.5A= 2W, therefore our resistor should be able to handle more than 2W of power. Aim for the next up available from a manufacturer.
This should cover all information you need about diodes for beginners. Leave me a comment if I missed something you think it’s important.


 server")

 Network attached storage under $21* #part1")


