No one likes to run their (often expensive 8GB RAM models) Raspberry Pi 4 boards naked. The selection of the cases and enclosures is great, spanning from inexpensive and stackable MaticBox cases, engineered to perfection, made in aluminium Argon Neo, or simply cases that transform your enclosure into a NUC style computer DeskPi Pro or Argon ONE. Nothing is more adorable than building a micro tower PC with the latest 52Pi case for your Raspberry Pi.
Twice!

Why twice? Initially, I received an early version of the 52pi Mini PC case which came with a front-facing 0.96″ OLED display and a 3D-printed body. I have seen similar designs online, and this is not the only case like this available out there. I used that version of the case for a couple of months, hosting my main automation server. It worked well, but I had a list of things I would change to make the case better.
These would include slots for cable routing, a better OLED display bracket, or getting rid of the loud secondary fan, and the ICE Tower cooler is perfectly capable of keeping the Raspberry Pi and associated SSD board cool.
I went as far as wowing to design the case with implemented changes so I could print it myself, but other things happened and 52pi has released the new and much-improved version of the Mini PC case. Guess what? It addressed all issues I had with the original design.
Plus it looks great too.
ZP-0128, ZP-0129, ZP-0120

These cases come in 3 configurations which you can pick from to match your need. All of them feature the tower alike enclosure, ICE Cooling Tower Fan and side panels. Individual models come with:
- ZP-0128 (AmazonUK, AmazonUS) – PC Tower case only without additional expansions
- ZP-0129 (AmazonUK, AmazonUS)- PC Tower case with 18650 UPS
- ZP-0130 (AmazonUK, AmazonUS)- PC Tower case with M.2 SSD SATA USB board
The case looks tall enough actually to fit UPS and M.2 modules together but as I only have M.2 one, that’s speculation at this point.
If you find yourself in the need of prototyping, the GPIO header is conveniently exposed by an extension which gives access to the 40-pin header directly or via a ribbon cable. As an added benefit, each GPIO is split into 2 pins, so you can still plug the OLED display while keeping the cables inside.
Assembly

While the prototype was a bit tricky to assemble, the included carriage on the final version of the case makes it easier. The whole process takes only a couple of minutes, and the only things to pay attention to are:
- Fit fan with the heatsink facing the RPI I/O way – otherwise it will collide with the header extender
- align pogo pins carefully to deliver 5V to your M.2 board
- install all connectors before adding the acrylic panels (guess how I came up with that tip)
- don’t overtighten the acrylic panels or they will shatter
That’s it – you are now a proud owner of the awesome case. The next step – is following the instructions to set up the cooling profile and use an OLED display.
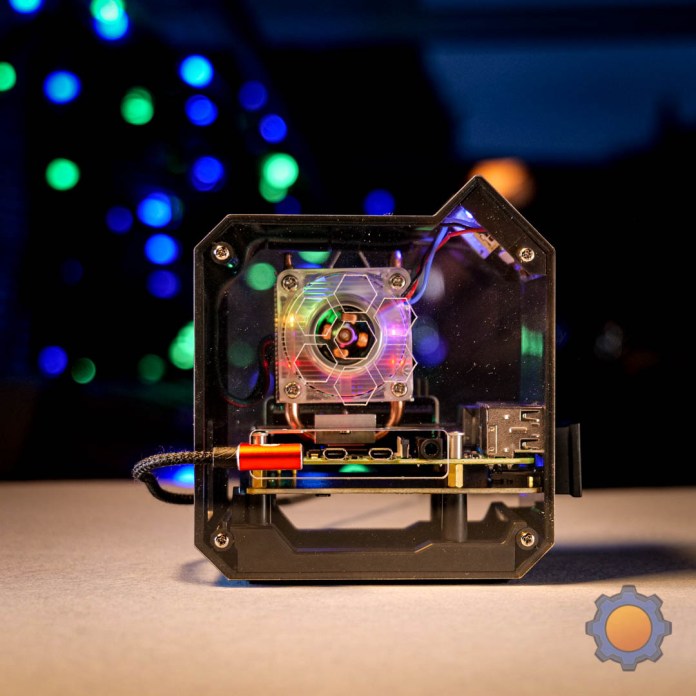
0.96″ OLED display

This time around, the OLED display is slanted 45° to make the monitoring easier. I appreciate the proper mounting bracket and a dedicated pass-through socket to connect ICE Cooling Tower Fan. It keeps things clean and neat.
To display things on it, you will need supporting libraries. You can install everything in one using the command set below:
cd
git clone https://github.com/geeekpi/absminitowerkit.git
cd absminitowerkit/
sudo ./install.sh
Just be mindful, that the dancing banana image (default) is set as a system process and if you want to override it, you have to disable the service:
sudo systemctl disable minitower_oled.service
I used libraries from this GitHub, and I found the sys_histogram to be very handy.
sudo usermod -a -G gpio,i2c pi
git clone https://github.com/rm-hull/luma.examples.git
cd luma.examples/
sudo -H pip3 install -e .
cd examples/
python3 name_of_the_file.py
You can make it permanent by simply setting it up on boot. sudo crontab -e:
#histogram example
@reboot python3 /home/pi/luma.examples/examples/sys_histogram.py &
From then the world is your oyster – just remember to enable I2C in raspi-config to control the display. That’s just a sample of what you could display on that little OLED, in reality, if you have the time and the know-how, you can try more complex things – from a list of tweets from a specific account to use the display to play Doom (obviously).
Improved (?) ICE Cooling Tower

That massively oversized heatsink for the CPU is going to outperform your Raspberry Pi 4 even with an overclock! 52pi found a way to make it a little better! We are not talking about the thermal improvements, but changing the RGB LEDs fitted to the fan. Previously, non-addressable LEDs were driving the animations. While fun in practice, you were limited to what you could use it for.
Thanks to WS281X series LEDs, you can address each light and drive custom animations on it. I will take the credit for this move, as the first thing I have done after receiving my ICE Cooling Tower for review in the past was modding it to support WS2812 LEDs and sending the colour information based on the CPU temperature. Bragging aside, the complete guide to getting that done is here.

Unfortunately, this comes at the expense of not having a dedicated pin to drive the fan’s speed. The fan is constantly on, but the noise is barely noticeable. I asked 52pi about this, and they confirmed one more revision of the case in which the fan will be controlled as well. It’s still possible to route out the fan wires directly to the Raspberry Pi 4 if you insist on having the fan controlled dynamically.
Thermal benchmark
I’m not expecting shocking results. I know the cooling will be efficient as I have bench-tested ICE Cooling Tower in the past (without the case). I decided to run the benchmark anyway to see if the ABS enclosure hinders things.

With an oversized cooler like this, the 52pi kit flies through CPU stress tests with stellar results. At idle, with the fan spinning slowly, the CPU would be at 40℃ in the 24℃ ambient temperature.
Then, I cranked things up a little with my NodeRED-based thermal benchmark utility and got these results for a 10 min stress test:

Settling at 54℃ – it’s a very respectable result, so whatever you throw at your Raspberry Pi 4, the case and the fan can handle it. Without cooling, Raspberry Pi 4 easily reaches 80℃ and thermal throttle in benchmarks.
M.2 drive and boot from USB
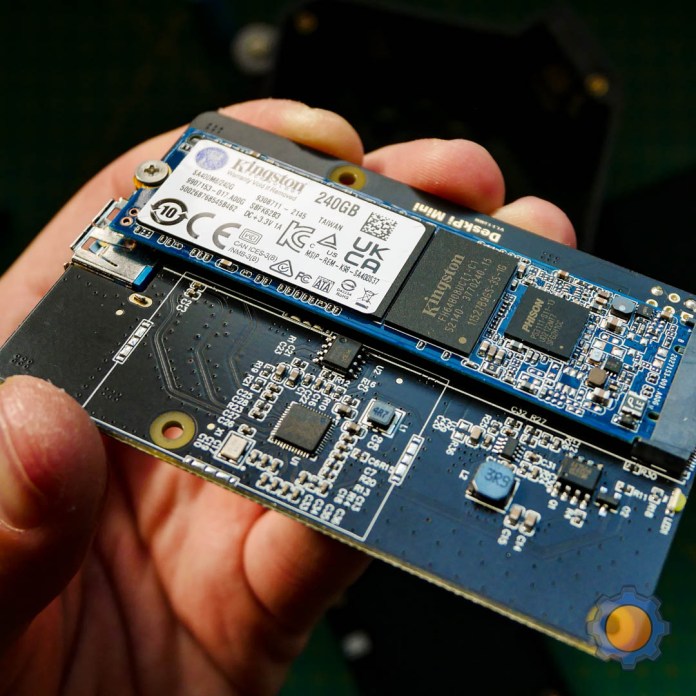
Where things get fun is the M.2 SSD support for SATA3-based drives. Make sure you buy SATA drives, not NVMe otherwise they won’t work over the USB. I already have a full guide covering the boot from the USB process on Raspberry Pi so here, I will just follow my impressions.
The truth is, that even with a fast micro SD card, data transfer will be capped by the Ethernet port. The biggest advantage of going SSD is to speed up the boot process and application load time. The actual access times and the read/write times will depend on the drive selected for your Raspberry Pi.
While most of the drives on offer, will reach speeds of 500MB/s – in reality, anything over 300MB/s won’t be noticeable on a system like Raspberry Pi, unless you have a very specific use case in mind. Anyway, I have some pictures verifying that the USB add-on is capable of keeping up with the Joneses – or as I call it – maximising the M.2 SSD read/write speed without hindrance.

Final thoughts
It’s a really cool case. The display is perfect for showing the IP of the system and the most basic parameters. Thanks to the beefy cooler you can overclock the CPU to insanity and the M.2 expansions give your Raspberry Pi 4 all the speed it needs to handle any task. In a pinch, you can use all the GPIO headers too! At £69.99 it’s not a particularly expensive case either, so if you are looking for something adorable – give the ZP-0130 a go and I’m sure you won’t be disappointed. Let me know what you think about it in this Reddit thread.
🆓📈 – See the transparency note for details.


 server")

 Network attached storage under $21* #part1")


