I always wanted a 3D printer and a laser cutter, even though I had (mostly) free access to these tools at my local Hackspace. Years went by, my 3D Printer count equals three (Ender 3, Ender 3 v2 and LD-002H) but I’m yet to find a laser cutter. I will have to settle for the 2nd best tool with lasers inside – Ortur Master 2 Pro laser engraver. What’s the difference between an engraver and a laser cutter? Engravers are “lite” versions of laser cutters that are less likely to burn you to the crisp. Perhaps I should really start small!
It’s not clickbait, I made my laptop engrave itself as well! Read on!
Wait! Self engraving laptop?
I needed something cool, something big, something that would showcase Ortur Master 2 Pro in action. A dull lid of my Lenovo Yoga laptop caught my eye. The grey, the smooth anodised surface is made of aluminium, making it somewhat laser resistant but also perfect to engrave. So far, I have completed a couple of test runs on included balsa wood, so taking on a challenge this big (15.6″ big to be precise) was making me a bit worried.
There is one problem. I’m actually using this laptop to drive Ortur Master 2 Pro. This is where hatched the evil plan of self engraving laptops. Engraving in my office where the desktop computer lives is out of the question due to poor ventilation, and with my back out of commission, I’m not able to drag a 20kg tower down the stairs.
The engraver’s work area is big enough for the laptop and all the associated cables. I can close the lid, place the laptop inside the frame with LightBurn running and use TeamViewer to access it remotely. That’s the plan, or a skeleton of the plan.
After running back and forth for 20 min, I found the perfect settings (using the underbelly of my laptop as a test surface) and aligned the position so the laser never leaves the edges of the laptop – an important metric in my insane attempt to use the wooden table as a base (I’m aware of the risks, but I’m struggling for a better surface until my metal sheet arrives!).
A few hours later, the job was done! I’m actually very impressed with the result considering this is my 1st engraving job. A closer look at details of my very first engraving made me feel like I could actually offer services like this to friends and family. What do you think? That’s one way to recoup the cost of the Ortur Master 2 Pro.

Lenovo Yoga – after transformation 
Engraved anodised alu in details
But I digress, we are here to talk engravers! So let’s do that!
Ortur Master 2 Pro
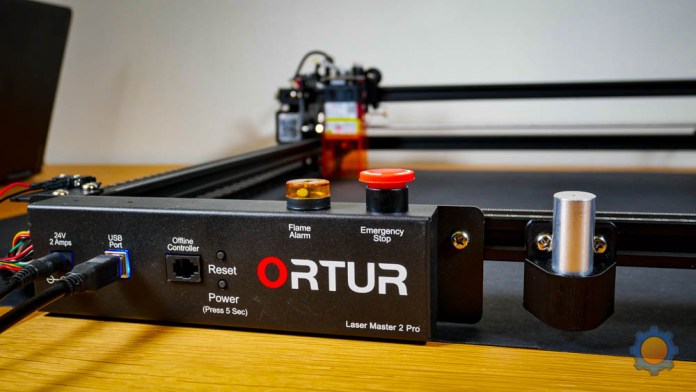
Ortur was kind enough to send me the Ortur Master 2 Pro and their kit to engrave on round objects. Both kits will enable me to stamp the “NotEnoughTech” logo on virtually anything! Laser engravers can engrave and cut through less resistant materials, not as powerful as the 60W laser cutter we have at the Hackspace or the gazillion Watt one at my work, which is a tad bigger than my kitchen, but good enough to get you started.
When it comes to these machines, it’s all about the materials you can/can’t work with, so I will try to show you what materials Ortur Master 2 Pro can etch and cut through. This will give you an idea of what sort of projects are possible. In the worst-case scenario, all my friends will be getting customized wine glasses alongside an etched “NotEnoughTech” wine bottle thanks to the rolling kit.
Specs

Ortur Master 2 Pro is a bit of a beast (for an engraver that is). It’s portable and capable of working on a 400mm x 400mm area. Since the frame can be lifted, you can get away with any thickness of the material. It’s not something I would advise, but in theory, you could engrave the bonnet of your car – I think you get the picture. The actual footprint of the machine is bigger – 60cm x 65cm
Gliding on 10×10 extrusion profiles we have Nema17 steppers moving the gantry and laser head with speeds over 6000mm/s (maxing out at 10000mm/s – don’t try it without bolting this thing down). If you want to go this fast, you will need to bolt the whole thing down.
The main weapon of choice is a 5500mW 24V LU2-4 laser head. It’s enough to engrave things, but probably too weak to cut through most of the materials in a single pass.
AliExpress is filled with similar-looking laser modules that go all the way up to “40W”, but:
- numbers are misleading
- most of laser modules are 12V
The actual power numbers on AliExpress are not accurate as refer to power consumption, not the laser module’s power output. Many 40W modules are in fact 7W-10W lasers – so the actual improvement is not as big as you would expect. This listing has a matching 24V which could be a good upgrade, however, the seller doesn’t list the actual optical power.
Most of the laser modules online are 12V, Ortur Master 2 Pro delivers 24V, so if you can’t find a suitable upgrade, you will have to step down the voltage (while keeping the PWM signal).
Make it yourself

Ortur Master 2 Pro comes as a pre-assembled kit. The gantry is mostly in one piece, while you are tasked with building the aluminium frame yourself. Do yourself a favour and trash that instruction. I used to assemble my unit, but you don’t have to suffer this way. Pictures are small and end stops shown on pictures are wired incorrectly. Fortunately, the PDF downloaded from Ortur’s website covers the process well with big pictures. Why this isn’t included in the kit? That’s beyond me.
You can build the engraver in about an hour and the rolling kit in about 30 min. It’s not a complex process, however, I had screws and L brackets spare which left me confused. Once I run the machine at 6000mm/s I quickly realised that these spare parts are ideal if you ever want to bolt the machine down and prevent it from moving.
Anyway, it was actually fun to build it and I learned a thing or two in the process, which is always helpful when troubleshooting things. You can watch me do this in a live stream below:
As long as you follow the new manual, you should be just fine.
Let’s laser things (safely)
There is a reason why all laser cutters are wrapped in metal bodies. Well, there are 2 reasons: safety and safety. Included laser specs come with a certificate that you won’t burn your pupils out instantly, so wear the glasses especially when dealing with an open design like Ortur Master 2 Pro.
The other safety precaution that the unit doesn’t come with is the smoke extractor. Laser engraving is a smoke inducing process and if you are thinking about getting one, make sure you have a well-ventilated garage, shed or table outside. Otherwise, the first thing that you will end up making is an enclosure and the fume extractor.
The features that Ortur Master 2 Pro comes with are a flame detector (yet to be tested) and an emergency stop that I already used 2 times upon discovering incorrectly wired end stops. Other than that, there is nothing but a small guard to stop you from burning your fingers. So keep this away from kids, pets and irresponsible people.
(What) to cut, or not to cut

I went through waste bins at work to bring some random materials home and see the effects for myself. When it comes to cutting/engraving with machines like Ortur Master 2 Pro you will be balancing 3 metrics:
- Laser strength
- Speed
- Number of passes
All three parameters define how long the laser beam is in contact with the surface. Each metric has its own benefits.
Laser strength
It defines the strength of the beam. Going all the way to “11” all the time isn’t the best strategy for every material. The higher the % the hotter the surface. Turning it up the max can set the material on fire, create unwanted scorch marks, or heat up and warp the surface.
Speed
Defined in mm/s, speeds up your workflow but also reduces the time the laser has to vaporise the material. Going fast will also introduce wobble if your Ortur Master 2 Pro isn’t bolted down. This is extremely important if you are going to use multiple passes.
Number of passes
Having your work done in multiple stages could be the only solution for more delicate materials. It will increase the time taken to complete the cut/engraving, but it can prevent unwanted damage to the material. When using multiple passes, make sure your engraver doesn’t wobble and the material won’t shift between passes.
Optimising workflow
It’s a good idea to make notes as you go. Create a list of what setting works best for your Ortur Master 2 Pro and the material. It will give you a good baseline next time you have a project to engrave.
You can use the 3 values above to manipulate your workflow. In general, you can:
- increase laser strenght and speed x2 to finish faster with the same effect
- decrease the laser strenght by half, increase number of passes by 100% to reduce burn marks
- slow down speed, increase number of passes to cut deeper
Just note things as you go, experiment and pick the settings that work best.
Careful!
Not all materials can be used safely. Some will burn, some will melt, some will vapourise stuff you never want to breathe in. For your own sake stick to well-known materials and keep safe. Also always wear safety glasses ESPECIALLY when working with reflecting surfaces. Scattered light CAN damage your eyes!
I used 1000mm/s with 100% fill and 30%, 60% , 100%, 3 x 100% passes for the cogs to check the settings. It should give you an idea of which materials are best to work with. It’s not a guide on the best materials to use so take it with a pinch of salt. Ortur gives you a breakdown of what to expect with their tools in this handy table.


| Material | Suggestions |
| Wood | unhealthy fumes. I was able to easily cut through balsa and with a couple of passes through the plywood. Just take your time |
| Aluminium | Not a scar. I had an 8mm stock and 2 mm brushed plate and both were clean as before the process. The laser is simply too weak or the surface too effective. Even with protective film, I was unable to scar the surface. However, you can definitely strip paint and anodising from metals. Worth considering – just check the effects on my Lenovo Yoga laptop. |
| Perspex | Clear perspex 10mm simply let the laser through and end up fogging up the bottom surface. 3mm white perspex was too reflective and there were no marks on it (with and without protective film). 5mm black perspex piece despite being polished like a mirror end up properly engraved and cut. The cut would require several passes. You could experiment with painting the layers with washable paint to see if this would help for more transparent stock. |
| PCB | You can scar the PCB but not the traces. It will make it easier to break a protoboard into the desired shape, but this laser head is unable to cut the bronze traces. |
| Stainless steel | Nice, black/blueish engraving marks. Whatever you will engrave will look really nice. If you are thinking of cutting through – dream on. |
| Other | It should work great with slate, non-reflective ceramic and glass, vinyl and paper. Just expect to play with settings and make notes on what works for you. |
Rolling kit (Ortur YRR 2.0)
While I haven’t tried YRR 2.0 add-on, (I don’t have anything suitable to support the engraver above the roller) it works as intended when I was just playing about with it. I might give it a go closer to my friend’s bday or x-mas to create a bespoke wine glass collection. I’m sure I will update you then.

YRR 2.0 Rolling kit 
YRR 2.0 Rolling kit and wine glass
The rollers replace the Y-axis. Sync up rotation will allow bottles and glasses to be engraved. The kit comes with a wine glass support, so if you ever wanted to give someone a customised set of wine glasses with a “self-made” bottle of wine, this is the kit you need.
Other upgrades
It’s not just a laser module that can be upgraded. Ortur offers an external LCD panel to drive the engraver without a PC, and a more advanced Z-axis adjustment module. I would be interested to know if you can automate the Z offset, to enable engraving on curved surfaces.
Note on LightBurn
I splashed out and got the LightBurn licence. I used the software before and I always wanted to have my own copy. The software lets you define traces for each element and has a nice tool to convert pictures into lines. It will automatically dither (create B&W gradient for imported pictures) so working with existing designs is easy.
You have a 30-day trial available, then it’s 80USD for a perpetual licence. I would strongly recommend the investment if you are serious about engraving/laser cutting.
Hint: use colour tags to define your best settings for each material, this way you are less likely to burn your material in the process.
Grab Ortur Master 2 Pro even cheaper from EU/US warehouse – use ORTURPRO code to lower the price to $449.
Final thoughts
It’s not the cheapest laser engraver out there. It will remove $459.99 from your wallet, but it will provide you with a pretty solid engraving setup. I’m pretty sure I could charge $50-100 to design and engrave laptop lids and make the money back in no time. I want to spend some time making an enclosure of it. Mostly to handle the fumes and extract them safely, then invest in a 7.5-10W laser module to tackle 3mm Perspex. If you have a garage or good weather in the back garden, then Ortur Master 2 Pro is a great little machine! It’s fast, has a great working area and it’s easy to work with. It could be a stepping stone before getting a proper laser cutter. Let me know what you think about it in this Reddit thread.
🆓📈💵 – See the transparency note for details.


")


