MiniWare continues to release the tools I desperately want to have in my workshop. They offer a fantastic balance between price, quality and portability. It’s started for me with the TS80 soldering iron (review) and now I get to talk about the MiniWare DS213 Oscilloscope. It’s gonna be a fun ride mostly cause I know what scopes are useful for, but I have no clue how to use one properly. Care to take the shotgun seat for this ride?
DS213 Oscilloscope

Some say that you can add $50-60 to the price of DS213 Oscilloscope and get a better scope, but that’s true for pretty much any oscilloscope out there. There is always one that does things a bit better than the cheaper ones. At some point, you have to draw the line and think about what do you need the tool for.
When it comes to picking the right tools, know your scope (mind that pun). Space on my tinkering desk is at a premium, so keeping my tools compact matters. I’m a hobbyist with a website and a couple of silly ideas in my head. If you are serious about your electronic engineering, then a more sophisticated tool is probably what you want, DS213 Oscilloscope feels like a really good fit. Please bear in mind this is a beginner’s take on the tool, so I’m going to miss a lot of details that will be probably important to anyone who has the actual clue. Feel free to send me tips and point out mistakes.
Hardware

What you get in the box is a DS213 Oscilloscope with 2 probes, spare clamps, identification rings and some stickers (obviously good stickers are important to decorate your maker space!). The DS213 Oscilloscope itself is a 4 channel (2 analogue, 2 digital) tool with a waveform generator. It’s powered by an internal LiPo and charged like a phone, through micro USB (hey MiniWare, what happened to USB-C?).
This thing is smaller than the marketing pictures suggest. It fits nicely in my hand and MiniWare also sent me a silicone cover and a ring holder. Considering the extreme portability and the lack of a built-in stand – it’s wise to get these.
I’m perfectly capable of interpreting the curves on the screen of an oscilloscope and drawing mostly accurate conclusions, but thanks to one million knobs and buttons on your average scope, I hardly know how to use one properly. DS213 Oscilloscope is less intimidating. The unit comes with 4 buttons and 2 rotary encoders.
The two supplied probes come with ground clips and are working in x1 and x10 modes. These are passive probes and use micro BNC connectors. If you want to know what x1/x10 stands for – it’s an attenuation multiplier, it decreases the sensitivity of the probe allowing you to work with bigger voltages (at the expense of available bandwidth). The probes don’t come with range compensation, it’s ok, as I don’t have any sophisticated tools to calibrate and check it.
Notable specs:
| CPU: | ARM Cortex M3 |
| Analog Channels: | 2([CH_A] [CH_B])0-40V |
| Digital Channels: | 2([CH_C] [CH_D])0-5V |
| Coupling: | DC, AC ±40Vpp (using X1 probe) ±400Vpp (using X10 probe) |
| Trigger Types: | Ascend/Descend Edge Trigger Mode, Positive/Negative Pulse Trigger, Logic Trigger |
| Sampling Rate: | 100M Sa/s |
| Bandwith | 15MHz |
DS213 Oscilloscope comes with power-saving options, fits in the pocket (except the probes) and is made of metal which makes it feel really sturdy, just like other MiniWare tools.
In use

Once you get the hang of it, the tiny menus around the edge start to make more sense. First, memorise the colours of your channels. I wish these were somehow indicated on the face of the DS213 Oscilloscope.
- Channel A – blue (analogue)
- Channel B – yellow (analogue)
- Channel C – violet (digital)
- Channel D – green (digital)
Use scroller B to change the menus around the scope’s screen and scroller A to select different values. The 4 buttons labelled like an MP3 player could use label tags instead of symbols and they have the following options:
- play/pause [K1] – RUN/HOLD
- square [K2] – Configuration/screen menu
- circle [K3] – change channel/colour of active menu / display grid rullers (T1,2|V1,2)
- triangle [K4] – acts as Fn or Shift
Handy shortcuts
| Key | Function |
| K4+K1 | Save screenshot |
| K4+K2 | Save waveform |
| K4+K3 | Correction/calibration |
The shortcut combinations above reveal more functions of the oscilloscope. You can save the screenshots and waveforms and export them via USB to a computer. Waveforms saved to the device can be also loaded up for later use. You can use these to perform mathematical operations between the saved waveform and the currently displayed one on the screen. I probably never gonna use this, but it’s a nice thing to have for more advanced users.
You can access the manual online here for a complete breakdown of each available function.
Oscilloscope newbie

Oscilloscopes show you the waveforms of the signals in electrical circuits. This visual inspection can be really helpful to understand how voltage and current changes across the circuit and if the device is sending/receiving data.
While typical multimeters can show you the value of the voltage/current, these are too slow in their measurement to register the changes and display it on their screen in a meaningful manner. The closest I had to date to an oscilloscope was Pokit Meter (review). It’s a really cool multimeter with a basic scope function. It was limited to a single channel and a 100x slower sampling rate. DS213 Oscilloscope is a massive step up in this regard (while not being that much bigger).
Let’s find a problem
Instead of going through every option in detail, I will simply show you how I used DS213 Oscilloscope to troubleshoot something. It will paint the picture of how useful the tool is and how you can get started at the same time.
I had been sent Sonoff POWR3 a few weeks ago. As usual, I would proceed with flashing Tasmota on it. I have done it so many times, that I could do it with my eyes closed, but I always wondered about DTR CTI pins on my FTD1232 programmer. I could google it, read the very complicated explanation and try to make sense out of it, or I could hook up a scope and see how pins behave during the flashing process.
My suspicion was that DRT and CTI pins could be used to pull the GPIO00 to GND (needed to enter the flash mode on boot) and to initiate the reset, by shorting the RST pin with the GND. You could measure DTR or CTI voltage with a multimeter to see if these default to GND, but reset requires a pulse, which is something you can’t measure with the multimeter.

Connect
Now that I understand the problem, I can hook up the DS213 Oscilloscope and check the behaviour of the pins. The probes come with grounding pins that clip to the probe itself and provide the scope with a reference. The hook attachments will be very handy for this as well to keep the connection solid.
I will use extra cables to keep the probes from shorting. It’s not the best workflow from an accuracy standpoint, but I don’t need precise measurements for my test. Both ground clips are hooked to the GND on my FTD programmer, probes are in X1 mode and attached to CTS and DTR pins.
I’m not concerned with reduced bandwidth. I will connect DRT to Channel A (blue) and CTS to Channel B (yellow).
Investigate

Before the action happens, we have to set the oscilloscope just right. I’m going to set the first 2 options (after the run) to DC as I’m working with DC voltage (AC setting can be useful to diagnosing oscillating DC signals too). I’m using the x1 probe setting for this reading and 1V as a resolution on my grid (I know I’m working with a 3.3V range). I disabled channels C & D (options 4 and 5) to remove unused waveforms from the screen. My Vtrg is set to channel A (blue) with the K3 button – this is the channel I will use to capture the output first. If this fails, I will swap it to channel B (yellow) and I’m looking at the falling edge as I expect the signal to be pulled to the ground.
I will leave the sampling at AUTO with 1mS and tweak it as needed. This will define the resolution on the X-axis (time). If this is too slow, I can set the sampling rate to smaller units (faster). I can skip a signal generation and focus on it.
Moving to the right hand’s side menu. I set the colour of Yp to blue with K3 and used scroller A to level the waveform on 0V (this is how you set your reference point). I have done the same for the yellow one. You can use V1 and V2 to set the grid lines (toggle visibility with K3). For now, I set these at 3V and 0V.
The bottom menu is split into 2 sections. 2 fields on the left correspond to Y-axis (Voltage) and 2 on the left to the X-axis (time). I don’t need any time reference for now, but I could use the information about ∆V and the voltage values. The first tells you the voltage difference between T1 and T2 grid lines and the second one shows the current-voltage level per channel.
Taking measurements
To understand what’s happening, we have to take 2 measurements. One when the FTD1232 isn’t sending any data and one when the flashing process begins. We will make the adjustments on the fly as required.
In standby mode, DTR is set at 3.12V and CTS at 3.V on average. No changes in the voltage levels. What happens when I press the “Flash” option in the tastier? DTR signal changes. It pulls the pin to GND several times in an attempt to establish communication. This times out after a couple of seconds.
To capture this better, I change the auto setting to NORM, adjust the timecode to 50ms and define my trigger points V1, V2 between 1V and 3V this way a falling edge in that voltage rate will capture the waveform for further inspection. You can also switch to SLOW mode to see things happen slower.
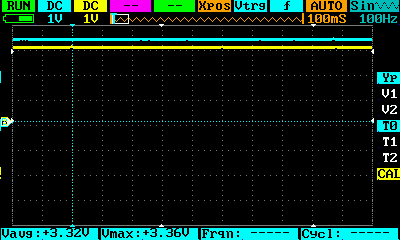
FTD Standby mode 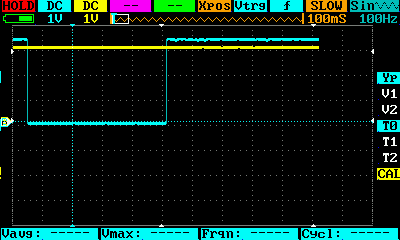
FTD DTR Flash behaviour
When an ESP8266 is connected DTR pin goes low for a split moment and returns to 3.12V level for the duration of the flash which is why you can use the DTR pin as a reset pin. You can see this illustrated on the DS213 Oscilloscope.
The ESP8266-01 flash adapter I made years ago used a button to imitate this behaviour. I’m wiser now, I can utilise the tools I have to better understand the process and build a better adapter. I hope this little showcase illustrates well how useful scope can be on your bench.
DS213 Oscilloscope for makers?
I’m still learning, and DS213 Oscilloscope feels like a great tool to keep your toes dipped into electronics without splashing out. The tool will set you back roughly £150, but with a decent promo code, you could find a bit cheaper.
I know some of you will argue against it, but I’m fully aware of what I will be using it for (poking around pins on development boards) and getting a more professional tool feels for now like getting a tractor to mow my tiny backyard. DS213 Oscilloscope lets me enjoy the hobby wherever I go and for now, completely meets my expectations. With a 15MHz bandwidth, it’s gonna be a while before I run out of scope. Unless I decide to troubleshoot WiFi networks – for that my friends, you need much bigger guns.
Improvements?
I’m not able to provide sophisticated feedback for this, but from a consumer standpoint, DS213 Oscilloscope could use better labels and instructions to get started with it. I very much see it as a tool that would draw people into more advanced electronics as a hobby, so lowering the learning curve goes a long way to achieve that.
Final thoughts
DS213 Oscilloscope is perfect for me. The space on my desk is a premium, I’m just getting the hang of things and the scope of my projects matches the capability of this little device. Once again, MiniWare finds a way to get into my life and make it more educational and fun. I know that the tool won’t be used as frequently as my MiniWare ES121 electronic screwdriver, but each time I need to troubleshoot something, I will have the insane pleasure of finding out the answer with my own DS213 Oscilloscope. If you have any good tips for beginners, I’m all ears, leave me a comment in this Reddit thread.
🆓📈 – See the transparency note for details.


