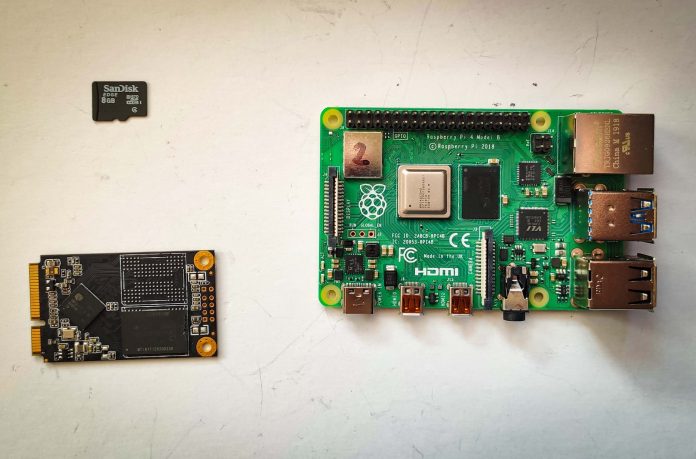
I completely ignored the experimental methods, because the Raspberry Pi 4 I want to update is too important to me to risk it. It’s been a couple of weeks however and it’s finally very simple to boot Raspberry Pi 4 from USB. I’m going to try this on the latest Raspberry Pi 4 (8GB RAM) and the DIY NAS kit by SunFounder (review) I reviewed earlier with a PNY SSD for storage. The method will work with all Raspberry Pi 4 boards, takes about 10 min and requires a microSD card and SSH access to your board.
Getting started
A micro SD card is still needed to create the image for the SSD drive and to configure the boot-loader correctly. Download the latest version of Raspberry Pi OS using the RPI imager (by far the easiest option) choose the image type and flavour (full|lite.. etc) and burn it to an SD card. I’m going to use the lite version.
Add an ssh empty file to the root directory (create a new file, name it ssh and delete the extension) of the sd card so you can access your board over SSH. Log in with default credentials (pi, raspberry) using PuTTY or a similar terminal client and update the card:


sudo apt-get update
sudo apt-get full-upgrade -y  (-y flag skips the confimration step)
sudo reboot
You will need a USB storage. You can try it with the USB stick (not recommended due to speeds), USB drive, USB SSD drive or use one of the add-ons like these to boot Raspberry Pi from USB attached mSATA or M.2 drive.
You will need to format the drive. Check the drive name with sudo fdisk -l you will see the drive listed as /dev/sda or /sdb (depending on the number of drives linked). At this point, I would strongly recommend you to format the drive.
Use sudo fdisk /dev/sdaand d to delete, provide the number for the partition if you have more than one, repeat the process until you have deleted all partitions. Use p to create a new partition and w to save the changes.

Boot Raspberry Pi 4 from USB
We have almost everything ready to boot Raspberry Pi 4 from USB. Let’s start with modifying the firmware channel. This tells your Raspberry Pi 4 what firmware it will use for the EPROM update. EPROM keeps the information about Raspberry Pi 4 boot. Open the file with nano:
Raspberry Pi config utility had been updated since and you can select the boot option using sudo raspi-config. Head to Advanced options and select Boot Order -> Boot from USB if available. It will set your Raspberry Pi for the boot from USB. Save settings, but don’t reboot the board just yet. If you get any errors when selecting this option, update the bootloader to the latest version using the Bootloader Version option and reboot.
Raspberry Pi OS Image to SSD
There are options to do this, but by far the easiest one for a person who isn’t really great at Linux-fu is this script. Thanks, Bill! You will need git installed so let’s quickly do that with sudo apt-get install git(I picked the Raspberry Pi OS Lite).
Now that you can clone the repository, let’s set it up:
git clone https://github.com/billw2/rpi-clone.git
cd rpi-clone
sudo cp rpi-clone rpi-clone-setup /usr/local/sbin
And you are ready for some action! List the drives present on your system: sudo fdisk -l and identify the one you wish to use as the new boot source. You will need to copy the data onto that drive to boot Raspberry Pi 4 from USB. My drive was labelled as /dev/sda so the command is:
sudo rpi-clone -l sda
From now on, the process is mainly automatic and it should only take you a couple of minutes. You will be asked to confirm the details of the process, so read the screen info and make sure that the presented values are correct. Once backup job is complete – it’s all done. So be a good maker and power down your Raspberry Pi 4 board sudo poweroff, take out the SD card and enjoy the boot from USB.

FAQ:
- Can I use that drive for other Raspberry Pi 4 boards?
No, Raspberry Pi will store the default boot option in the EPROM so unless you configure the new board first, you won’t be able to swap the USB drives as you could with micro SD cards. - Can I make the backup of that modified image?
Yes, read more about therpi-clone– it has the option to resize the partitions to fit the new partition size. One of the unwanted consequences is that the unmodified image size taken from the (unpartitioned) drive, will have the drive size – so in my case just shy of 256GB! Regardless of how much of that space is actually used. - Can I go back if I don’t need it anymore?
Yes, to reverse the process, simply power down the Raspberry Pi 4, burn a fresh image of Raspberry Pi OS and put the card in – then power the board as normal! Just remember if you do this, your boot drive won’t work any more.
Final thoughts
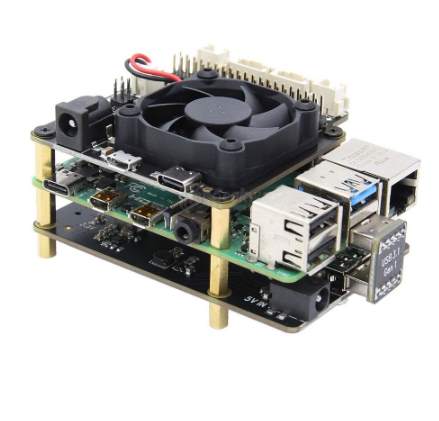
The process is much simpler now. I hope this guide helps you to boot Raspberry Pi 4 from USB! If you have the drive to spare – go ahead and use it! I will be using this with my mSata add-on board for Raspberry Pi 4 with Argon18 case mod for Argon one (review). It should make the Raspberry Pi 4 run very well for years to come! Let me know if you have any questions about this process in this Reddit thread.


 server")

 Network attached storage under $21* #part1")


