I found some time to play with the DockerPi Sensor Hub I got a couple of days ago. This Raspberry Pi HAT can be used as a standalone expansion and an add on to the DockerPi series. I talked about HATs from this series before, so if you follow me, DockerPi Sensor Hub should sound very familiar.
DockerPi Sensor Hub

The HAT will work with the standard 40-pin GPIO header for any Raspberry Pi boards. It’s designed as a HAT, so it would work best with Raspberry Pi 2/3 & 4, but it’s possible to use it with Zero series too.
- Docker Pi Power Board (review)
- 4 Channel Relay HAT (review)
- ICE Tower Cooler (review)
- IoT Node (GPS, GSM, LoRa) (review soon)
- NightLigt HAT (review soon)
- UPS Pro 18650 board (review)
DockerPi Sensor Hub comes with a 12V 4 pin header for the power transfer. If you already have a DockerPi Power Board (review), you will be able to transfer 12V DC to another tier. Don’t worry if you don’t have one, it’s optional.
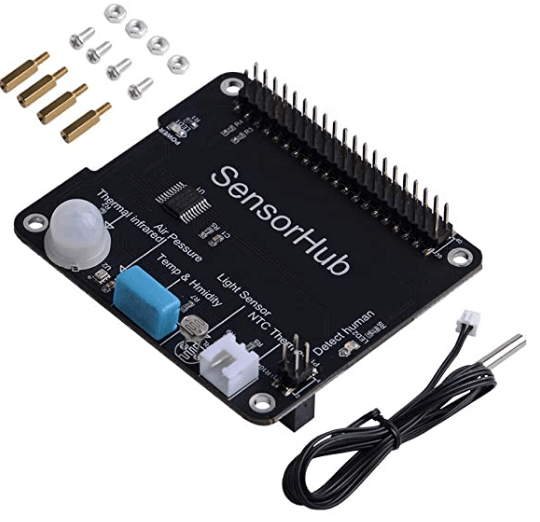
All DockerPi HATs use I2C interface to talk to the microcomputer. This one is no different and it uses 0x17 register. The board is equipped with the following sensors:
- External Temperature Sensor -30℃~127℃
- OnBoard Temperature DHT11 -20℃~60℃
- P. Temperature Sensor -40℃~80℃.
- Humidity detection 20% Rh ~ 95% Rh
- Light intensity detection 0Lux~1800Lux
- Pressure detection 300 Pa ~ 1100 hPa
- Presence detection 100 degrees, the maximum distance of 12m
The Wiki for DockerPi Sensor Hub is well composed and you get the sample script to work within Python, C and Java. I thought I would put my own spin, and as I mainly do NodeRED tutorials, I will show you how to use this board with NodeRED.
Buy DockerPi Sensor Board
Buy it using these links to support NotEnoughTech.
Flawed
Having an array of sensors like this is a great learning tool, but I have to question the placement of the sensors. All, but external temperature sensors, over-report the temperature due to heat coming out from Raspberry Pi 4 (in my case- take a look at the thermal benchmarks). Unfortunately, this heat will also influence the humidity sensor.

I will probably design a 3D printed case where I can mount the sensors and use a ribbon cable to separate the sensors from the board itself. If you already using DockerPi stacks, I would put the DockerPi Sensor Hub on top of the stack to limit the heat reaching the board.
DockerPi Sensor Hub in NodeRED

Since there is no designated node (that works) with I2C, I decided to “cheat” a little bit and use the exec node to communicate with the python3 script. If you never used the exec node, it will trigger a command in CLI and post the result of that command back as msg.payload.
The Python script isn’t suitable for NodeRED, so I spend extra time translating all values into a JSON formatted message (learn more about JSON). Once the response was formatted as JSON -I had no problem mapping the values to an interactive dashboard.
#enable I2C - navigare to interfacing
sudo raspi-config

#install the libraries
sudo pt-get install python3 python3-smbus
You can set the updates to 5 seconds, and all sensors will report the values. Of course, you can use these to trigger other flows and incorporate the values into your designs. The dashboard is purely for decorative purposes. You can download the whole flow from this link.
Buy DockerPi Sensor Board
Buy it using these links to support NotEnoughTech.
Conclusion
I would strongly advise you a ribbon cable (like this one) DockerPi Sensor Hub with a ribbon cable and think of a custom enclosure for this board unless you want to monitor thermals inside a bigger enclosure. The board isn’t expensive – $16.99 at Seeedstudio Store. I will update this article once I have a 3D design ready until then it’s all in your hands. If you have any questions about DockerPi Sensor Hub let me know in this Reddit thread.

Project Download
Download project files here. Bear in mind that Patreon supporters have early access to project files and videos.


 server")

 Network attached storage under $21* #part1")


