It was a matter of moments before I decided to ditch the eWeLink app and flash Tasmota on Sonoff POW 2. If you are interested in off the box functionality, take a look at the hands-on post. I’m going to turn my soldering iron on and start hacking. We all knew this was coming.
Modifying PCB on Sonoff POW 2
I have to give it to the ITEAD guys, they made a splendid job in making this Sonoff board hackable. All you have to do is to add the female header or male pins to the dev pads and you are off to the races.
I had female headers available so I picked a 1×6 header and soldered it neatly to the board. It’s a 5 min job, even if you have to wait for your soldering iron to heat up. It used to be the case, but not any more thanks to YIHUA 992DA+.


I’m sure you have noticed neatly labelled pins on the PCB. For a moment, I wondered where is GPIO00, which is needed for Tasmota, but a quick inspection of the ESP8266EX on the PCB reveals that the pin is mapped to the physical button! Awesome!
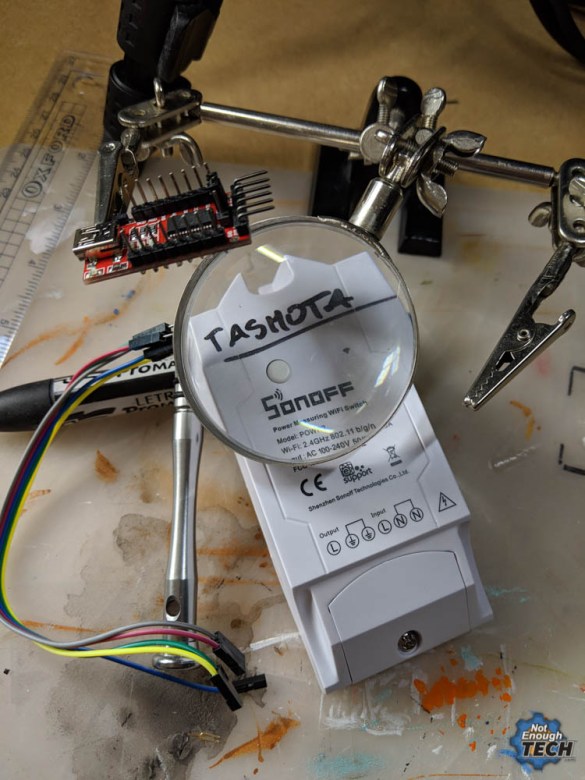
Flashing Tasmota on Sonoff POW 2
Tasmotizer tool makes flashing a breeze, so use this guide to flash the firmware and configure Tasmot for Sonoff POW 2. I would strongly recommend, that you back up your firmware first and rename it to match the device you are backing up. Consider using a permanent pen to mark your device accordingly (inside the enclosure?) as the backup of the firmware is device-specific.
DO NOT connect the Sonoff POW to mains during the operation. FTD1232 is more than capable to keep the ESP8266 alive for the flash.
| Sonoff POW | FTD1232 |
| VCC | 3.3V (or VCC) |
| GND | GND |
| RX | TX |
| TX | RX |

Buy Sonoff POWR2
Buy it using these links to support NotEnoughTech.
Using Tasmota on Sonoff POW 2
If the flash has been successful and you didn’t configure Tasmota on Sonoff POW R2 it will advertise as new AP. Connect to it and load the configuration page. The device’s IP should be 192.168.4.1 but double-check this in the WiFi manager. You are looking for the gateway IP address.


The first configuration mage will ask you for the WiFi credentials. Fill that in and wait for the Sonoff to reboot. Remember, at this
MQTT

It’s the most convenient (but not only) connection protocol for your Sonoff, visit Configuration/Configure MQTT to connect to your broker. I recommend the following changes:
- client ID
- topic
- reverse %prefix%/ %topic%/ to %topic%/%prefix%/
I’m swapping the topic and prefix around as I find it more convenient to read. Don’t worry too much about this, as the correct topic format is visible in the Console option in the Tasmota firmware. Copy it from there to your MQTT setup.
The MQTT topics will depend on your configuration, so you have to adjust the topics in my examples. I have included some basic flows in my NodeRED, so you can see how you can trigger the relay and how you can intercept the state and power use data.

The MQTT rate of data is set by default to 300 sec. If you need the energy info posted more often, check out the Configuration/Configure Logging menu and adjust the Telemetry
HTTP

MQTT is not the only way to control the device. You can do so with HTTP endpoints. If you want to secure the HTTP endpoints with a password (which you should), visit the Configuration/Configure Other, menu. To create the HTTP POST Request use the format below.
https://xxx.xxx.xxx.xxx/cm?cmnd=Power%20TOGGLE
xxx.xxx.xxx.xxx = Sonoff's IP
Power = command type
TOGGLE = value

https://xxx.xxx.xxx.xxx/cm?&user=USERNAME&password=PASSWORD&cmnd=Power%20On USERNAME,PASSWORD = use your web access credentials in sonoff settings
xxx.xxx.xxx.xxx = Sonoff's IP
Power = command type
On = value

//Get power info
https://xxx.xxx.xxx.xxx/cm?&user=USERNAME&password=PASSWORD&cmnd=Status%208
USERNAME,PASSWORD = use your web access credentials in sonoff settings
xxx.xxx.xxx.xxx = Sonoff's IP
Status = command type
8 = value
In this post, you will find the list of all commands that you can issue. The list is long and the commands listed can take more than one parameter. The response given will contain a JSON object with the current device state. If you want to learn more about JSON I have the basic tutorial for you.
Conclusion
Tasmota on Sonoff POW R2 is the way to go! I’m going to use the new device for 2 projects. One Sonoff POW R2 will drive my 3D Printer and provide power use calculations for each print in my mobile notifications project. The other one will monitor my washing machine, as I’m constantly forgetting about it. What other uses could you think of? Let me know in the Reddit discussion thread.

Project Download
Download project files here. Bear in mind that Patreon supporters have early access to project files and videos.


