When it comes to Android phones, I want a cool device, root access and working Google Pay. Then, I can enjoy the phone as intended. Now, that Xiaomi Mi9 has proven to be cool, it’s time to work on the root and Google Pay! It took me a couple of days to figure everything out, so I thought I will share NotEnoughTech’s guide to Root & Google Pay on Xiaomi Mi 9. If you want to root MiUI12.5 I have the guide done on Xiaomi Mi 11 (review) instead.
Rooting Xiaomi Mi 9 and fixing Google Pay
Before you dive deeper, I take no responsibility for your actions. The process worked on 06 Aug 2020 (Android 9 and Android 10, Android 11), but do additional research and take care when following the steps – while the process isn’t as risky as it used to be, you can brick your device if you are not careful.
Now, that you are warned, I will name things we will do to Xiaomi Mi 9. I will also fix the notification issue mentioned in my review.
My Xiaomi Mi 9
The model I have is Xiaomi Mi 9 64GB, (CEPHEUS) Global Version shipped with Android 9 and MIUI 10 (V10.2.13.0.PFAMIXM). I successfully rooted my phone with MiUI10, MiUI11 & MiUI12.

Due to the issue with disappearing notifications, I will switch from the Stable Version and Load the Developer version where the notification issue has been fixed. If your Xiaomi Mi9 is not affected by this, or the issue has been fixed, you can skip this step.
- Unlock
- switching to Developer’s MIUI 10
- Setting up ABD
- Root with Magisk
- Fixing Safe Net
- Fixing Google Pay
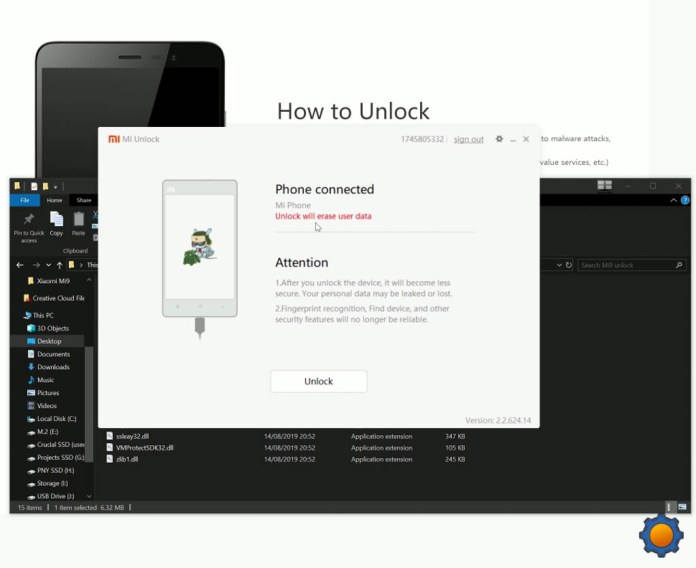
Unlocking Xiaomi Mi 9
Xiaomi Mi 9 requires you to log in to your Xiaomi account to use the sync and to unlock the phone. The unlock tool will check if you can actually unlock your phone and will introduce a timer!! Mine was nearly a week, and you have to use your phone actively during that time. It sucks, but to my knowledge, patience is the only way to bypass it. So if you have to wait XX hours, follow me on social media and bookmark this page! I will see you in a week or so!
Downloads:
To unlock Xiaomi Mi 9 – you will need the Mi account logged in on your phone, and you will also need the SIM card to be inside. Download the unlock tool and follow the simple steps:
- Settings— About phone— MIUI Version (Keep tapping it to enable developer option).
- Settings— Additional settings— Developer option and bind your approved Mi account under Mi Unlock Status. Enable Unlocking.
- Log into the Mi account which has acquired unlocking permission on your device.
- When you logged into the Mi Unlock Tool, tap on the top-right gear icon to check the update for both USB driver and Mi Unlock Tool. Make sure you’re running the latest version.
- Turn off your device, press the Power button and Volume – down button at the same time to enter bootloader mode.
- Log into the unlocking tool on PC with the same Mi account. Connect the device to the PC using a USB cable
- Press ‘Unlock‘ and follow the timer/ waiting period shown in Mi Unlock Tool to unlock successfully.

The process takes about a minute and providing you have installed the drivers, you should not have any problems.
Switching to Developer’s MIUI 10 (9.6.27)
If the notification issue is fixed, feel free to jump ahead, otherwise, you will either flash the Developer’s ROM or use a 3rd party app to fix the notification issue. I decided to go to the Development Beta ROM as the issue is not present with that release. I know with time, this fix will make its way to the official channel.

Downloads:
Download a FASTBOOT version of the ROM for Xiaomi Mi 9. I used this link to get my image. Verify the device and the model of the firmware and download the MiFlash tool. Unzip the image, check the folder – you should see “flash-all” scripts inside.
My version of the tool had a couple of quirks. Folder names could not have spaces in the names. Name your folders correctly and open the tool. If you are given an error when opening the tool, navigate to MiFlash folder and create an empty folder “log”.

Select the folder that contains the “flash-all” files and check the bottom of the window, don’t lock the phone. The process will take about 7 min.
Setting up ADB (Windows 10)
Download the latest Developer Tools from Google. Unzip the folder to your preferred location. Before you start using any commands, do yourself a favour and add the variable path to the system variables. It will save you time, as you will be able to use ADB from any folder using PowerShell.
Downloads:
On Windows 10 press “Windows” key (or search) and type “advanced system settings”. This will bring up a window with “Environment Variables” as an option.


In the bottom window, search for the PATH entry and hit “Edit“. Create a “New” path and use “Browse” to navigate to the path where you have extracted your platform-tools folder. Save the entry and OK all the windows.
Magisk and Root (No Custom Recovery)
Many of you will probably argue why custom recovery such as TWRP is needed, but I will spare myself the hassle as I actually never use it. Once you pick your ROM and stick with it, there is hardly ever need for one.
Go to Mi 9 settings and enable USB debugging in Developer options. You should know how to do this from the Unlock section.
Downloads:
If you switched to Developer ROM you already have the files to work with, otherwise, you have to download the Fastboot version of the MIUI you are running on your device. Inside, you will see images folder – extract the boot.img and copy it with MagiskManager.apk to your phone’s storage.

Install the Magisk Manager. Switch to the “beta” channel and click to install – select “Patch image file” and select the boot.img file you just dropped into the internal storage.

Magisk will create the magisk_patched.img file in “Downloads” folder. Copy this file back to the computer and open PowerShell (Shift Down + Right-click) in that folder.
Boot your phone into recovery state (power off, volume down & power) and use the command:
fastboot flash boot <patched img>
If you opened the PowerShell in the same as the magisk_patched.img simply type “mag” and press TAB to auto-complete the path. This will take about 10 sec, then you can reboot your phone:
fastboot reboot
Congratulations, you are rooted!
Safety Net issues
While Pixel 3 passed the safety net in flying colours, the Mi9 needed a bit of Googling first before I found out how to fix the issue so I could move on to hiding Android Pay.


In the Settings menu of Magisk Manager, hide the app and prevent it from being detected. You can also check the Download section for modules – search for the safety net. These changes over the time – Try MagiskHide Props Config.
Yes, it’s so simple!
Making Google Pay work on Xiaomi Mi 9
Unfortunately, hiding Google Pay and Google Services in Magisk is no longer working on its own, but with a little bit of work, it’s possible to enable Google Pay on Xiaomi Mi 9.

Downloads:
To fix Google Pay, I had to follow the instructions from this XDA thread. Big thanks for the fix! Use SQL editor and navigate to /data/data/com.google.android.gms/databases/ and open dg.db file.
You will see 15-18 entries in a folder. Open it and look for anything that has “attest” in the A column. Select that row and edit C column to “0” (it should be set to 10 by default. Edit each line that has the attest in it.


Close the editor and open Terminal Emulator. Grant root by typing:
su
and then navigate to the same file:
cd /data/data/com.google.android.gms/databases/
and lock the file
chmod 440 dg.db
Close the Terminal Emulator. Go again to Magisk Manager – Hide and make sure that Google Pay & Google Services are hidden (you can hide all of them) and in the settings of the Magisk – Hide Magisk Manager.

Open the Google Pay app settings clear cache and you can enjoy the Google Pay again.
Conclusion
The process should take you about 30 min, providing you have decent internet speed, and Xiaomi unlock tool won’t make you wait for days. Now that I have root and Google Pay on Xiaomi Mi 9 I can enjoy the phone, Tasker profiles and pay for the coffee! Questions? Here it the Reddit thread for you.
Speaking of coffee – consider buying me one if I saved your time! ☕

 server")


")


