So, I have a laser cutter now. The “how” and “why” is covered already in the initial article, so check that for context. As the ownership dust has settled, it’s time to put some work down instead of making empty announcements. This means EVERYTHING must go! Oh, I’m not going to throw away stuff, but take the laser cutter apart and prep for the restoration work ahead. This means work! A lot of it.
What’s wrong?

I think the laser cutter had an untreated coolant leak at some point, and all that moisture has damaged the paint job and created fields of rust at the very bottom of the enclosure. Plus for some reason, the whole thing stinks of weed! I’m sure this is a byproduct of a laser cutting into something weird, but the smell has to go too.
I’m not aware of any parts being damaged other than the CO2 laser tube needs replacing – preferably to something a tad stronger than 50W. In turn, this means a new power supply to give it more juice. Other than that, the entire strip is orchestrated for my pure enjoyment of learning how this thing works (in detail) and making sure I don’t have to do it for years to come!
Who doesn’t need an extra project or 15? Right?
Vevor

I mentioned in my initial article that I found the same laser cutter on Vevor.co.uk – in case you want to get one or are looking for spares and references. Imagine my surprise when Vevor reached out to me asking if they can help restore the machine to its former glory.
They supply more than parts and ready laser cutters. They have a wide selection of industrial machines, tools and bits that you probably need for your workshop. If you live in the UK (like me) or in the US (like most of my readers) then dedicated Vevor stores will cater to your needs.
They hook me up with much-needed upgrade parts for my Vevor 50W Laser Cutter:
You know where the tube comes in (we will need an extension to fit this monster inside) but the sliders? I’ll use them to build a nice stand for my new machine with a big drawer underneath to hold the stock.
Mechanical stripdown

The strip wasn’t too hard. All components are attached to a big enclosure made from sheet metal parts welded together. To completely strip the machine down for painting, you will need basic tools. I honestly got by with my Wera Tool-Check PLUS and some pliers to hold things in place or move seized parts.
Document!
I took some pictures of the complex parts (gantry, wiring cabinet, Z-axis mechanism) and made notes about what goes where. I also took a couple of videos (other than for my YouTube entry, in case I need further reference. I know some of you would keep the bolts more organised, but I simply dumped all bolts and nuts for each section of the machine together.
If had to do it again, I would do two things differently.
- Cut all wires that end up with spliced-in connectors. Do this first, as it will let you move the parts out quicker and will save you some time in the process. This will also give you a good indication of where you should have connectors, so next time, you can simply unplug these to remove components for maintenance.
- This particular machine has an access flap underneath the CO₂ laser tube. Knowing this, I would deal with this panel as soon as possible, to remove the entire gantry without much disassembly. I realised quick enough, but not before removing some parts from the gantry.
It will ease the gantry restoration, as I can simply work on the entire assembly on my workbench and slot it back into the machine as one when the work is done. The only mechanical work I’ll need to do before that is to tension the belts and check them mechanically before it gets slotted back into the enclosure.
Electrical stripdown

While inspecting the wiring cabinet, I identified some issues with the wiring. A couple of bodged soldering jobs, mismatched wire here and there. It’s clear someone was working on the machine before. As I found a pretty self-explanatory wiring diagram associated with my controller board, I decided to go bold, and simply remove everything.
I’ll be running this machine mostly unassisted, I want to make sure it meets better electrical safety standards. I wired a couple of industrial robots, so I have a vague idea of the task ahead.
I might keep some of the cables, as some are in good condition or at least as a length reference. My work consistently fills the cable recycling bins with high-quality cables of random length so I had been bin diving for the past few weeks to have a stock of useful off-cuts. There is no reason not to reduce some of that waste.
Paintwork
The enclosure was damaged by time and coolant leaks. I could ignore the paint damage. I knew it would add hours to this project. I decided to go with a custom paint job as I want the machine to stand out. It’s my biggest tool in the “workshop” and it has to look cool.


Due to the size of the machine, my options were limited. To do this properly, I would either have to give it a chemical bath to remove the paint or find a place to sandblast the enclosure. Stripping it to the bare metal would be ideal, but it was not feasible on my budget.
I opted out for the next best thing: elbow grease and newly acquired Bosh hand sander – it’s the £35 investment I can afford. A lot of elbow grease and sweat later, the machine had all the rust cleaned off, and most of the original paint was sanded down but still attached to the metal panels. As the laser cutter enclosure is made from bent metal panels dip-coated in thick paint, it’s extremely difficult to strip it down to the bare metal (especially on the inside). As the paintwork has a substantial texture, the sanding process was tedious and took me more pads than I could count.
Prime and paint
I picked the cheapest primer I could find (red) to cover the exposed metal and sanded-down panels. It will keep the rust away and give me a paintable surface, to begin with. Sadly, areas without the original paint were very visible after the primer was applied. Additional passes with my hand sander didn’t improve the surface finish either.


My last line of defence was to use a car bodywork filler to even out the gaps and create a nice look at the surface finish. It’s not perfect, but it will do the trick. If you ever use the car filler epoxy, be advised the mix is usable for about 5 min. Work quick and in small portions. Some sanding passes later I ended up with the enclosure and panels smooth enough to be painted.
To paint the enclosure, I picked the blues & yellows matching the NotEnoutTech logo and add contrast and depth to the original panels. With help from masking tape a ruler and a black sharpie, I hand-dawn the outlines of the logo across multiple panels and then spray-painted the areas in appropriate colours. I used a total of 6 cans to cover the surface.
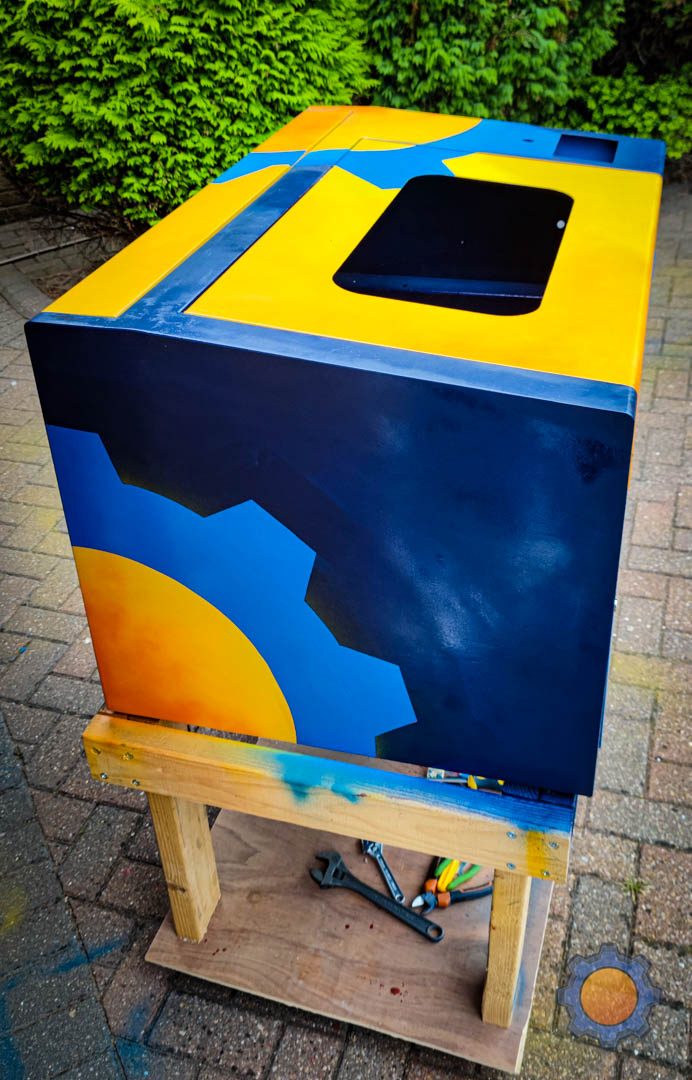


To be fair, without logos, the machine looked dull as heck in a dim garage, I consider this to be a stroke of genius (accidental but still) and I’m extremely happy with how it turned out. It may look whacky and like something from the Borderlands game – but I love it.
The progress so far
I had a vague idea how what the laser cutter would look like in my head and what work I had to put in to get there. I misjudged both ideas. It looks far better than the image I had in my head, but it took way longer to get there.
I spent about 2-3h stripping down the components, then about 6h painting everything with multiple layers (not including the time it takes for coats to dry). Sanding and preparing the surface took the biggest chunk of time. I think I spend about 12-15h on this alone. Lessons learned.

The current state of the project:
✅ Get it to my garage (I needed at least one checkbox ticked, otherwise it looks depressing)
✅ Identify all main components
✅ Measure CO2 tube compartment
✅ Strip clean & re-assembly
✅ Painting the enclosure
❌ Mechanical test of the gantry
❌ Electrical test of the laser
❌ Inspecting lenses and mirrors for signs of wear
❌ Re-fitting cooler and air assist
❌ New stand with 500 x 300 raw stock drawers and better caster wheels
❌ Fumes extraction system
❌ Looking for alternative controller boards and custom firmware
Next up: Mech Scrum
In the next part, I’ll rebuild the gantry. It’s going to be fun, as the gantry can be assembled on my workbench and slid into the enclosure when finished. I hope you like the restoration project so far, and that you find my tips/errors useful enough! Big thanks to VevorUK for taking patronage of this build, so give them a browse if you are looking to spruce up your workshop. Have you ever taken on a similar project? Let me know your best tips in this Reddit thread.
🆓📈 – See the transparency note for details.


